Sunday, September 28, 2014

Last Jamicure for September ......

The end of September was pretty busy for my husband and I. He had some projects at work that were taking some extra long hours, and we were expecting our very first visitors in our new place. Very exciting! My parents were here for six days; which we cram-packed full of touristy places to see, and delicious food. 
On the last day my parents were visiting, my husband and I were waiting for them to check out of their hotel to come meet us so we could go out for brunch before they headed out of town. I knew it would take them a few minutes from when they called to say they were on their way, so I did what every Jam girl does when there are a few spare minutes. I changed my Jamicure! 

I brought my stuff out to the living room and set up my little nail station on the ottoman. My husband sat in the chair next to me, chatting until my parents got there. My mom was watching me with my application and I showed her which design I'd picked out. My husband looked down and said, "Whoa. You're done already? Didn't you just start them a few minutes ago?!" :) 

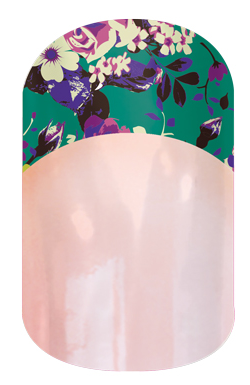
I decided to stray from all the pink, and go a different route this time... 

Take Aim paired with a retired Colorful Arrowhead Accents wrap. 
(the picture on the left was outside in natural (shaded) light, the picture on the right is natural sunlight inside to see the detail of the colors in Take Aim)


I really love the design of  Take Aim, but I was slightly disappointed that the colors of the arrows weren't brighter. But I still thought they were super cute! They'll be really great for someone who likes a more subtle-ness to their nails. :)


***Note; I totally would have done the whole Mother/Daughter Jamicure time, but my mom isn't allowed to wear nail polish or even acrylic/gel nails at work. I thought about doing them with her the first night they arrived so she could have cute nails all week and easily remove them when she got home.. but we were just so busy! Maybe next time... 

Sunday, September 21, 2014

New Fall/Winter 2014 Jamberry Designs


Just like everyone else with a Jamberry addiction, I was placing an order at the beginning of September with the announcement of the brand new Fall & Winter 2014 catalog. Over 100 NEW designs. 

When I first received my catalogs, I sat down and carefully looked at every single design. I marked the ones I already had and starred the new ones I wanted. But, I narrowed it down and picked out six. 


Once these arrived, I could NOT wait to wear some of my new designs. Problem was... I'd just done them a few days before (#firstworldproblems - I know, I know). So, I admired my latest Jamicure as long as I could. Which only happened to be about six days. I've NEVER changed out my wraps in such a short time frame. Like, ever.

I'm always finding ways to mix & match my wraps. I feel like I get more out of them if I'm not doing a whole entire mani or pedi in the same wrap. Plus, when there are so many to choose from, how else are you going to get to see them all!?

I instantly fell in love with Lady Lace. I'm pretty sure it's my new all time favorite. (And I realize I could be saying this because my previous all time fav got locked away in the Jamberry vault forever at the end of August. RIP Sugar Plum Glimmer.) But seriously now, Lady Lace is gorgeous!

Here is my Lady Lace & Orchid Ombre Jamicure.
(also featured is the cute, New Jamberry Mini Heater)


Tuesday, September 16, 2014

Removing your Jamberry wraps

Jamberry Nails are not harmful to your nails, unless improperly removed. You cannot just pull them off. They use a strong, heat-activated adhesive that allows them to stick to your natural nail.

These are two really great ways to remove your Jamberry wraps. 


The oil method is perfect if you do not want to use chemicals/polish removers, especially on your little ones! 


You can also use any nail polish remover to loosen up the adhesive. 

Monday, September 15, 2014

September Stylebox


Last month Jamberry started a new feature - a monthly subscription. You can now have Jamberry wraps delivered to your door! 

Each month will feature one item from the current catalog (a wrap or a lacquer), AND one coordinating exclusive item that will never be available to order. 

I seriously haven't been more excited about getting mail! August featured a floral design and a coordinating chevron. Who doesn't love chevron, especially in multiple shades of purple!? 

Want to know what the mysterious September Stylebox beholds? 

Bold colors! Happy Go Lucky (from the current catalog), and a color coordinating Ombre. It's SO pretty on! I can't even explain.


I knew that as soon as other Jamberry consultants or customers were getting their September Stylebox, they would be posting pictures all over Facebook or Instagram. I didn't want my jamicure to get lost, so I did something different. 

I paired the exclusive Ombre with an accent nail - Lotus


I am looking forward to wearing Happy Go Lucky, and I think I know just the wrap I want to use as an accent nail. Because, accent nails are ALL the RAGE right now. ;) 

Jamberry Pedicures - How long do they last?


As promised, I wanted to share my previous Jamberry pedicure. I mentioned in my last post that I'd had my toes done for six weeks. For real. :)


Here's the pedicure I did. Now, some may say it's cheating because I only have wraps on my big toes. But I have had complete Jamberry pedicures last as long. I just haven't always remembered to take pictures to share!

This is day one. A retired Jamberry design, Pink with White Stars on my big toes, and current Jamberry Lacquer, Kiss, on the rest of my toes.


Here is my pedicure after six weeks, on day 42.
There's clear growth on the cuticle end, but from far away, can you even tell? Because I can't! I even trimmed my toenails at one point and the Jams still stayed on. 


I can't always afford to go to a salon and get a profession pedicure, so I really love that I can do my own, and have them look professional! 

Thursday, September 11, 2014

My Jamberry Pedicures


I can't tell you the last time I saw my toe nails bare. For years and years I have either gone to a salon for a relaxing pedicure or painted them myself at home. I just spent the past seven years living in Texas so I am sure you can imagine the number of sandals I own. Your toes ALWAYS have to look nice! 

I love getting a professional pedicure every once and a while. I used to go once a month when money allowed. But the last time I had a girls spa day, I was about $95 in the hole for a pedicure and plain manicure (no polish so I could do Jams when I got home!). Ouch. Granted, I spent more than usual because it was a special girls day, but still. On average I was spending $40 on a pedicure when I went. And sometimes, I didn't even go to a stand alone salon... I'd enjoy a pedi at the one in Walmart from time to time. (still spent $40, too) 

This is where Jamberry saves me. I can do my own pedicures and they are not just polish. They're super fun designs and look professionally done! 


The best part about a Jamberry pedicure? They LAST. Like, for a really long time. Seriously. I did a new set yesterday, and the set I removed had been on for SIX weeks. Forty-two days. No joke. Sure, there was growth on the cuticle end, but they still looked really great. And from far away you can barely tell. I mean, who *really* sticks their face that close to your feet anyway?! 


**(The photos of my six week Jams are on my phone, so I'll do a post about those when I upload later!)** 


Here's my NEW Jamicure! These are a retired design, Impact Moon. They were featured as a "french tip" design. I am LOVING these. My husband and I were sitting on the couch watching a movie, and I couldn't stop checking out my toes! :) 


Now, here's the cool part I was telling you about. You can see how little it took for me to do my toes. I used the big piece on my big toes and then used what would be left overs if I had done a manicure with these wraps.
*The reason I used two different halves for my big toes, rather than cutting one in half is that Jamberry gives you two different looks for the "french tips." If you look closely, you'll see that one end of the teal color is smaller than the other. So next time I'll use the other halves and there will be less teal with more of the "tip" design. :)

Now that I have one pedicure done, I will still be able to use the rest of this sheet to do one more pedicure and two manicures. I'll probably even have a couple pieces left over to do accent nails with my Jamberry Hint of Mint Lacquer!


Are you as excited about Jamberry pedicures as I am?

Impact Moon is a recently retired design, but it can be re-created with some of the NEW Fall/Winter styles like .... 


Imperial Tip                Zebra Tip 


Saturday, September 6, 2014

Embracing Retired Designs


Ten days since my last Jamicure. That's about as long as it takes for me to get antsy and want to do something new. My Jams still look amazing, but I seriously can't wait. Especially when I ordered from the Going, Going, Gone retirement list at the end of August. So you can imagine how excited I was about finding the signature purple envelope in my mailbox! 

Today's Jamicure is not pink. I know, you're shocked. ;)  I am too actually. I wasn't sure how I felt about either of these retiring wraps but the more and more I saw them, the more I just had to have them! I didn't care if my husband has some strange hatred for the color teal! (For real. He loathes anything teal.) 

I'm sure you've already noticed this, but I looooooove to mix and match my Jams. I often take advantage of the Buy 3 Get 1 Free deal, to find designs that complement each other or wraps I already have. 

I've had a lot of compliments on this Jamicure. I might have gone a little crazy. I'm not sure that adding the white chevron was a good idea, but hey, other people thought it looked great! 

I am wearing: 
Retired Turple Ombre, Retired Teal Sparkle. Accented with White Chevron (NOT retired!). 


I realize I am probably teasing you with some of the retired designs that are no longer available, but you can re-create a similar look with some of the new Fall/Winter designs! 

Here is: 


Wednesday, September 3, 2014

Jam Time

Since my Jamberry collection keeps growing, I had to find a better way to stash all my stuff!

I was recently at Walmart or Target and decided to take a stroll through the photo area to take a peek at albums. As I mentioned in my last post, storing Jamberry wraps in a 4x6 album works perfectly. I was using two 4x6 albums that I found for $1 each. But now, my Jam collection has grown. I found this super cute glittery spiral album that works perfectly!!

Just a few weeks ago I hosted a Thirty-One Gifts party. I ordered a couple organizing items but was the most excited about the mini tote for my Jamberry supplies. Tonight I finally sat down to organize things. To my delight .... everything fit!


How are you storing your Jamberry Nails & accessories?


My Mini tote is full! Currently holding ....
1 Jamberry heater
1 mini rice bag
12 bottles of Jamberry Lacquer (2 box sets, 4 individuals)
1 zip lock filled with nail sticks, files, scissors, cuticle oil.